How to Create a Thin Rectangle in Canva – New Tutorial for 2024!!!
This post may contain affiliate links which means I make a commission if you shop through my links.
Disclosure Policy
Sometimes the simplest things can drive you crazy – like trying to figure out how to make a thin rectangle in the new Canva interface.
It is actually really easy to do – but they don’t make it easy for you to figure out.
Crazy, I know.
Watch the Video Tutorial – New for 2024!
It is easier for me to show you how to do it – so I made this quick video to explain the process.
If you would rather read the tutorial, just keep scrolling below.
Step 1: Find the Rectangle Outline in Shapes
Go to Elements and then Shapes in the left hand menu bar.
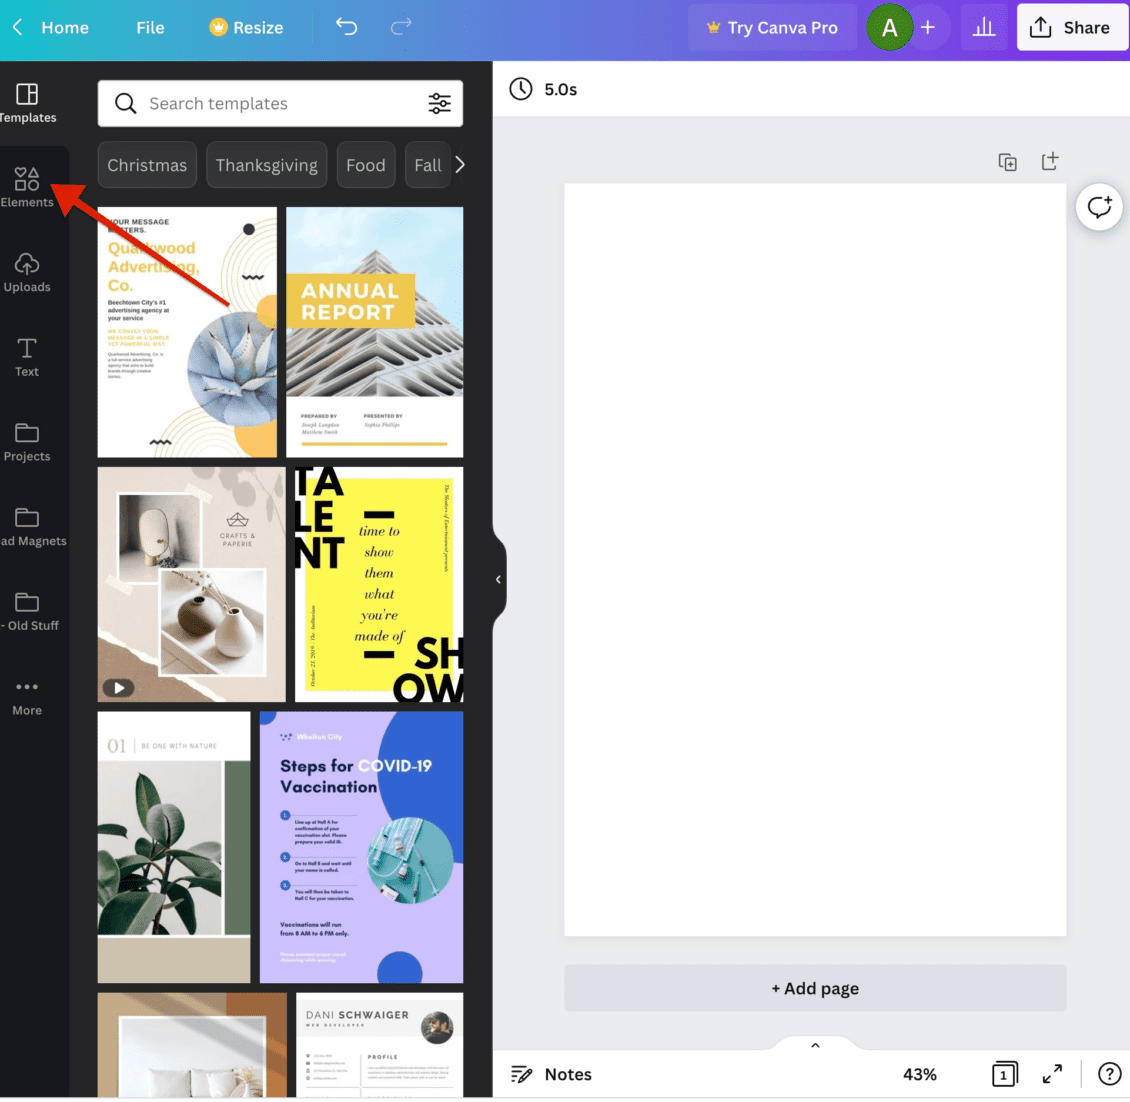
You are looking for an image of a solid square.
If you don’t see it in the few items presented on this screen, then click on “see all” on the right hand side next to “Lines & Shapes”.
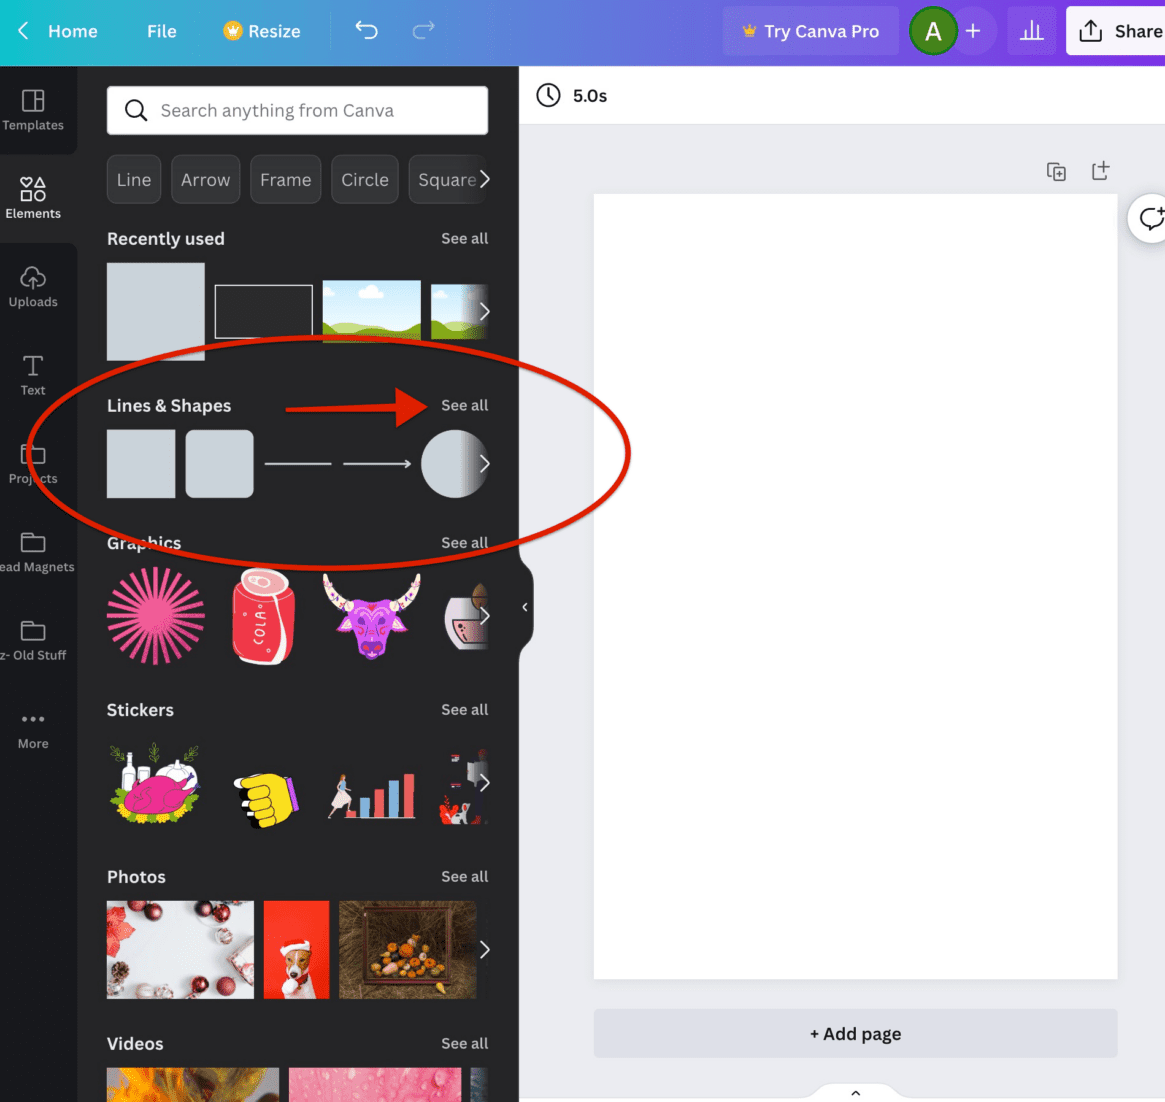
Scroll down through the shapes until you see the solid square.
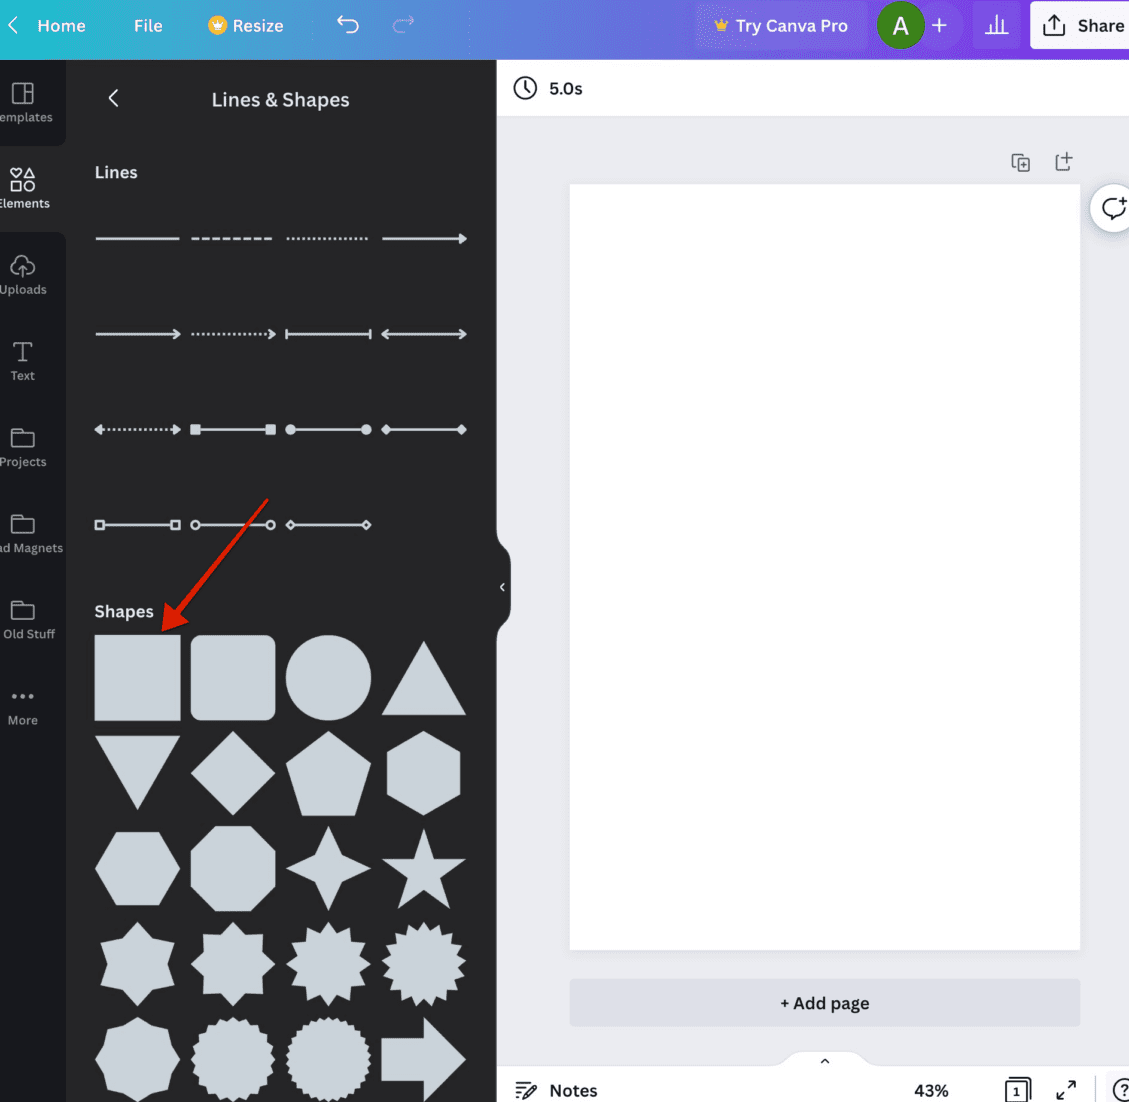
Click on this element (it’s free) to add it to your workspace.
Step 2: Add an Outline to the Square Design Element
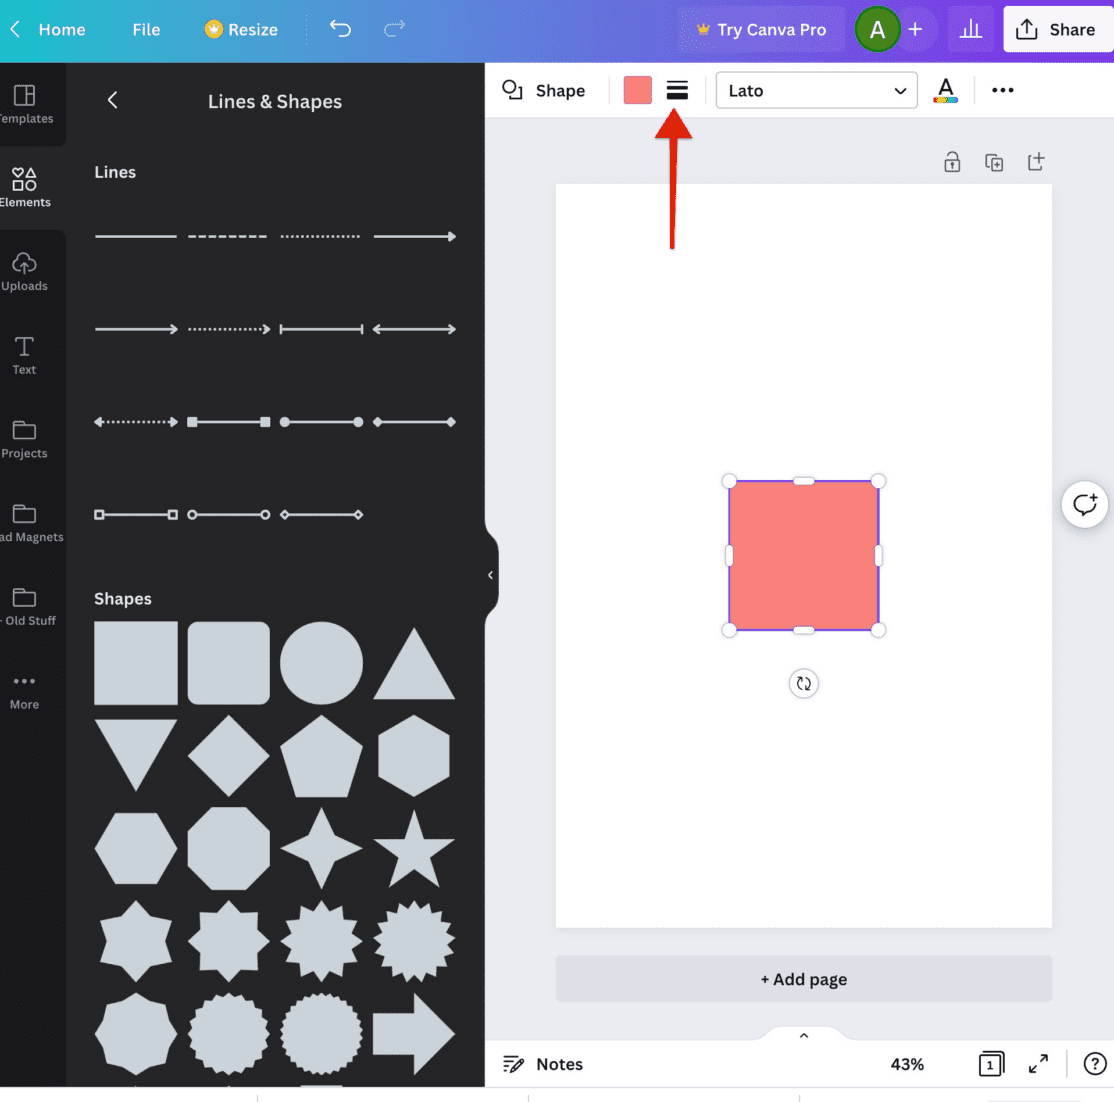
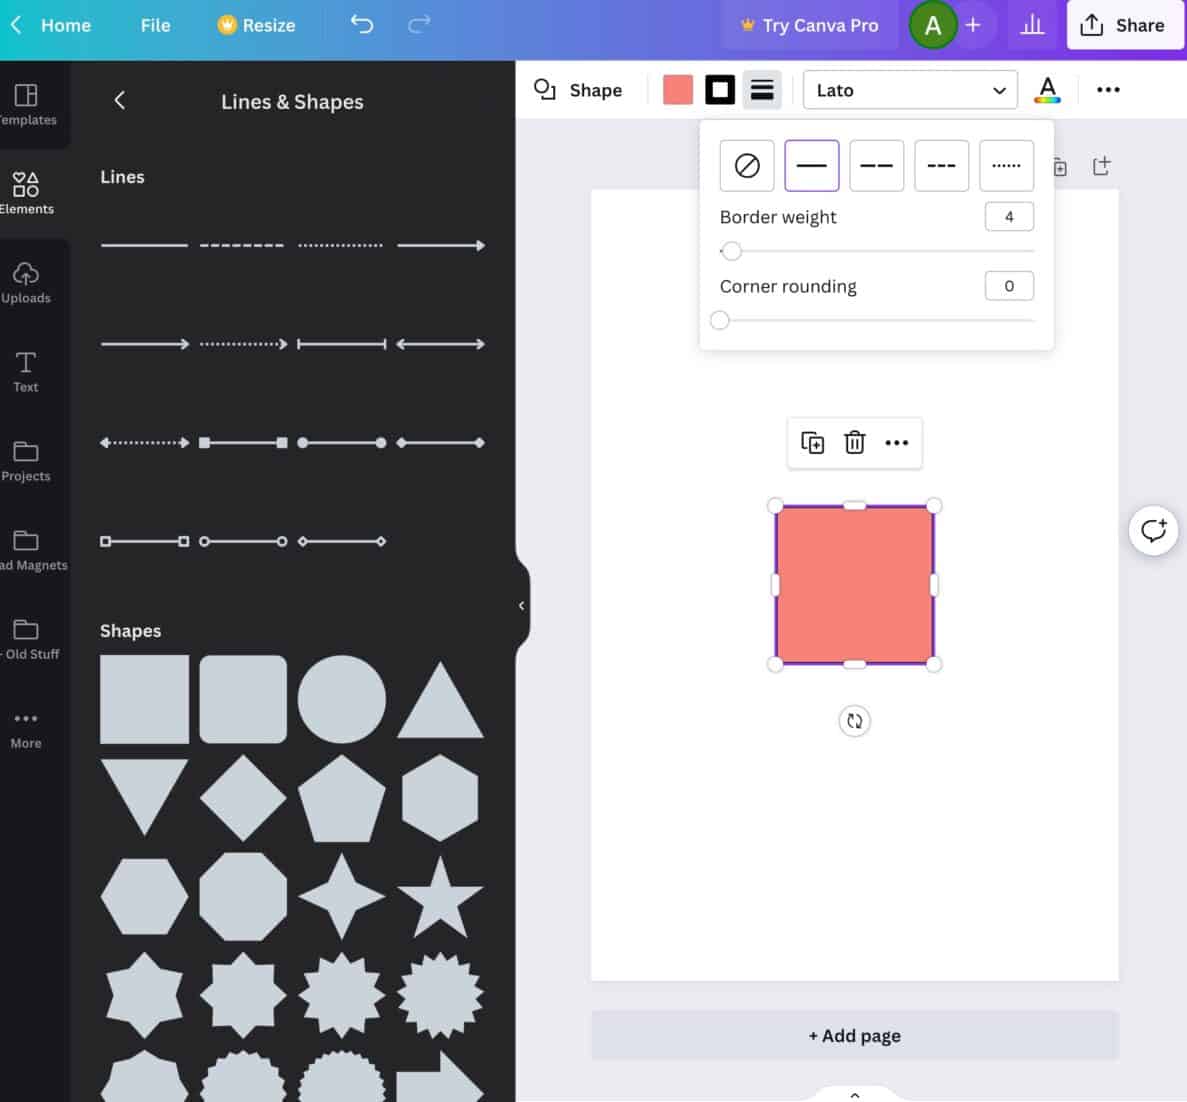
What you need to do at this point is to add an outline to your solid square.
You do this by clicking on the image of three increasingly thick lines in the top toolbar.
When you click this, you will get a choice on what style of border to add (solid, dashed, etc), and options for the thickness of the border.
The outline defaults to 4 pixels, but you can use the slider to make it thinner or thicker.
Remember that if you choose 0 pixels, the border will disappear – so one pixel is the thinnest that you can go.
Step 3: Make the Inside of the Element Transparent
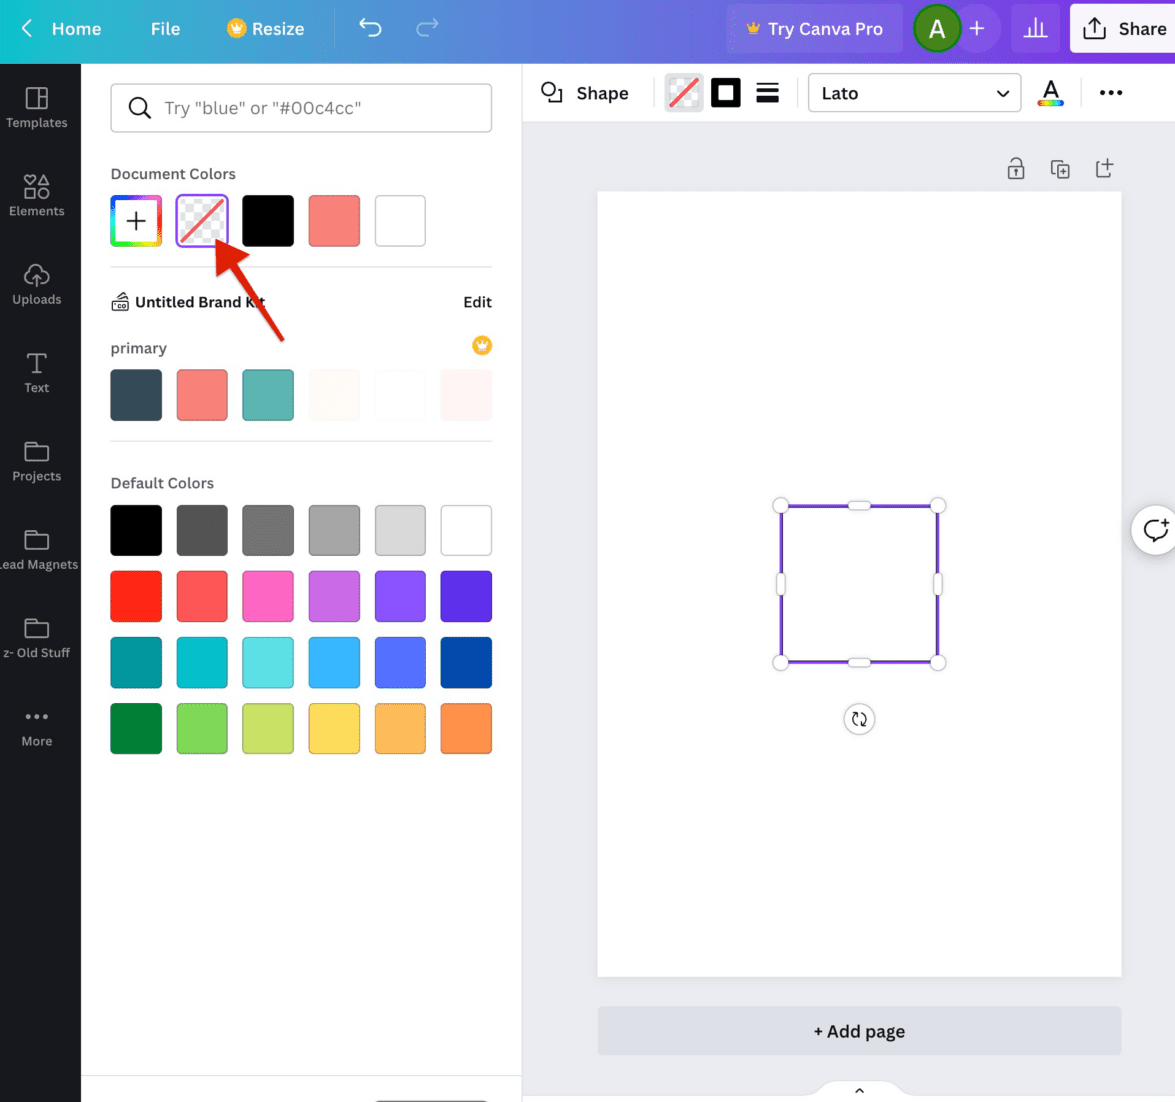
The next thing you want to do is make the inside of the square transparent, so that all you see is the border that you added in step 2.
To do this click on the solid square in the top toolbar.
Then, choose the box with the gray checkerboard and diagonal red line going through it from the choices on your left.
Step 4: Change the Square to A Rectangle
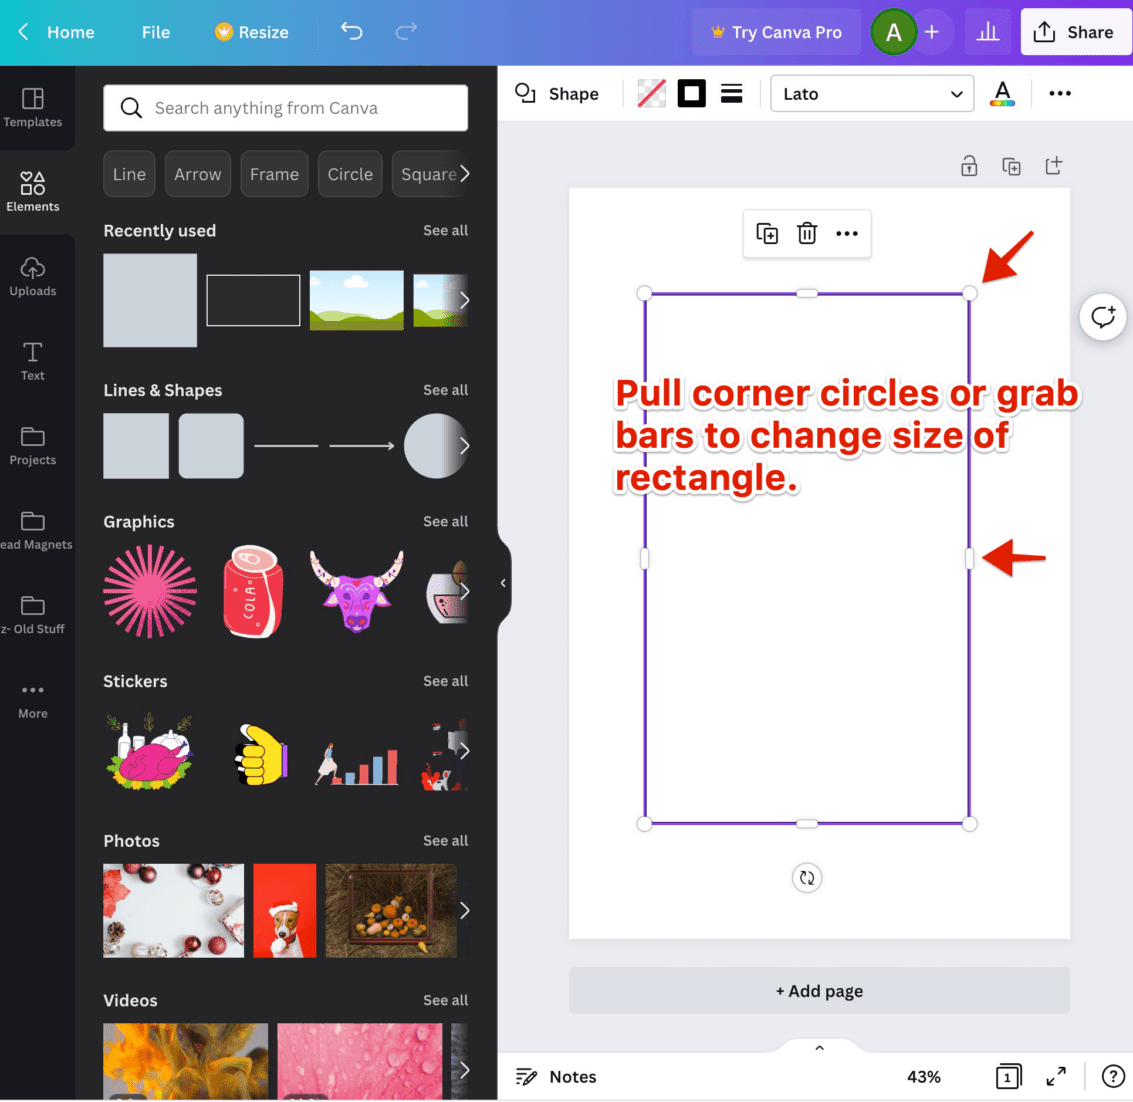
The final step is to change the square element into a rectangle.
This is super easy to do.
Simply grab one of the corner circles or one of the side grab bars with your mouse and drag.
The square will morph into a rectangle of any size you choose.
And – the best part is that your thin rectangle border will stay the same thickness no matter how big you drag your rectangle. Those of you who have been using this a while will remember that in past versions of Canva, the thin border would get thicker if you dragged your rectangle bigger.
No more! This is such a huge improvement!
It’s Easy!
And there you have it – a thin rectangle in Canva.
Simply
- add the solid square element to your workspace,
- add a border,
- make the inside transparent,
- and drag the corner circles or side grab bars to resize the square into any size rectangle.
Your rectangle lines will stay thin.
Please tell me that I am not the only one having trouble figuring this out!
And make me feel better by pinning the image below, please.
What are some of things that have you perplexed in Canva?
Share in the comments below.


Thank you so much for creating this article. I found other sites and links but nothing was what I was looking for but THIS IS. My head was about to explode not being able to figure it out. THANK YOU!!!
Hi Sarah,
You are welcome! I am so glad that you found this Canva tutorial to be helpful!
I too have spent so much time trying to figure our this simple task! I am still unsuccessful though as I can’t find the image your are referring to. I cannot find a rectangle that give me the side grab bars. I go in Elements, search for Shapes, but no image like you are selecting becomes available. Can you give me the keywords associated with your selection or something? I am a not-for-profit so I actually have even more than the free version.
Thank you!!
Hi Kristi,
I just took a look – and yup, Canva changed their interface again. The good news is that you still can create a thin rectangle and it is pretty easy to do! I created a new video here to walk you through it, and I am working on updating this post as well. Thanks for letting me know! https://www.youtube.com/watch?v=moK_JZrXyCI
Thank you SO much. I have spent a year not being able to do this and I so much wanted dotted line borders that are totally sizeable.
Hi Jill,
You are welcome! I am so glad that you found the Canva tutorial to be helpful.
OMG! THANK YOU FOR THIS!!!!!!! I’ve been swearing at my computer for a solid 17 days.
Hi! I have a pro (ha ha ha I’m no pro!) account, but I can’t find *anything* with grab bars. I followed the tutorial.
Hi Jen,
Not sure if you have figured out the thin rectangle thing in Canva – but I took a look, and they did indeed update their interface again. I just updated this post for the new look. The good news is that yes, you can still create this element and it is easy to do, it’s just tricky to find. I hope it helps!
Thank you so very, very much for making this tutorial! I’d set aside a project for the past week because Canva had been making me want to lose my mind.
I have oh-so-many questions about how to use Canva such as– when I click into a text box to continue typing, why does my view of the page move to the top of the text box instead of to where my cursor is? So, say I’ve been working elsewhere in my document, but see a typo somewhere in the middle of a large text box. I double-click in the text box, but I can no longer see my cursor (which is now blinking and ready for me to make my edit) because it’s scrolled me up to the top of the box. Any ideas if there might be a way to prevent this from happening? I’ve been finding it so incredibly annoying😅 Thank you!
Thank you so much!!! I saw this in a template and I’ve been looking everywhere to figure out how to recreate it so I can use it in my own templates. I swear, sometimes the things that should be the easiest are the hardest to do in Canva.
Thanks again!
NOTE: It is the FRAME option that gives me a resizable rectangle with horizontal grab bars. BUT I can’t find any way to change the color! Also GRIDS might work for some uses, but a VERY small number of options and cumbersome. I’m beginning think a simple resizable border has been removed from the FREE plan? Thanks again for your post on this though. At least I know the difficulty has not been unique to me!
Thanks for this, but I still can’t figure out how to make this work! (Mar 1, 2021). I have no “Elements” just “Graphics”. A search for “white rectangle” only gives me a white rectangles with NO horizontal grab bars. If I choose a colored rectangle that DOES have horizontal grab bars, then I can’t change the color! I’ve tried “frame”, “border”, “rectangle” and nothing has worked. Maybe one needs a PAID version of CANVA to unlock this basic thing?? All I want is a resizable frame with an adjustable color! Or, maybe I am doing something wrong still?? (Whatever happened to simple FILL and STROKE?!)
Hi Jane,
I just went into my Canva (free version – today 3/1/2021) and the thin triangle is still there in the elements tab. Just follow the video and you should find it.
@Neena Nandagopal, THANK YOU Neena !!!!! I don’t have a tab in my Canva that says “ELEMENTS” (which I think is called “GRAPHICS” in the version I see in my desktop) but I FINALLY FOUND IT !!! YAY! I award you Best Advisor on the Internet/Canva !! :o) Thank you SO much! I was about to give up. If I ever get my eBook complete, I will send you a free copy!
Thanks so much! <3
Thank you, thank you, thank you!!! I was like how in the world can I get this done.
THANK YOU!!!! This was driving me nuts!
You are welcome!
Life saver! Something that should be easy is so hard to figure out. Thank you!
You are welcome!
Oh, my word, thank you SO much for this tutorial! I’ve searched forever to be able to figure this out and no one has made it clearer than you have. I’m not a Canva newbie but I simply couldn’t figure this one out on my own. Thank you, thank you!
Hi Allison,
I am so happy this helped you – thank you for letting me know!
Wow, it really should not be this hard. I am disappointed with the new interface. Thank you for making this post. I wasted so much time trying to figure it out on my own!
Hi Ginger,
Happy to help!
I went to elements, searched rectangle frame… and was not able to find the thin green rectangle! Any other suggestions to find this? Thanks!
@Hannah, ME EITHER!! Its driving me crazy, that I can’t adjust something so simple as the dimensions of a rectangle to be thinner or longer! Please help if you can Almost Practical!
Hi Abbie,
I just updated this post to show you how to create a thin rectangle inside the newly updated Canva interface.
The good news is that – yes, you can create one and it is easy to do, the bad news is just that it is tricky to figure out where and how to make it happen.
I hope you find this tutorial to be helpful.
If the video isn’t loading, wait a few minutes. I just uploaded it so it might still be rendering.
Hi Hannah,
I know this reply is very, very late but yes, Canva changed the interface. The good news is that you can still create a thin rectangle. I just updated this post to show the new instructions. I hope this helps.
Ohh my heck! Thank you SO SO much!
You are right. Sometimes it is the simplest things that elude us.
Hi Vicky,
You are welcome!
Thank you SO much for sharing this. It has been immensely helpful!
You are welcome!
THANK YOU!!!!! So incredibly helpful!
You are welcome!
Lifesaver!!! Or Huge timesaver!! Thank you so much!
Stacy,
You are welcome!
Perfect – you just saved my sanity!
Yay! So glad it helped. 🙂
This is genius! Thank you… Canva is generally intuitive, but this feature was not! I’m repeating what everyone else said, but this is a great tip 🙂
Thanks, Kam!
Ah, THANK YOU!! This made me so mad for the longest time!
Hi Brenda,
You are welcome!
Wow! Thank you !!!! 🙂
What about a box with a partial line erased, like half of the middle bottom line erased to insert a logo.
Hi Wendi,
So, I was not able to find a rectangle with a partial bottom line.
But I did create the first image shown below using the rectangle element from this post and a circle frame placed on the bottom line.
I put my logo in the circle frame as an example. The thing with frames on Canva is that you cannot insert an image with a transparent background or cut out type pictures. So I used a jpg of my logo that had a white background.
I used the same technique on the second image below using a white background on the whole photo to match the white background in the logo, then I added a word overlay with a transparent background to make the logo look like it is floating. However, if the words get too close to the frame, then the white background from the frame overlaps on the words and you can see it – which is not what you want.
It is a kind of convoluted process to get the look you are going for – but I guess it can be done.
Thank you Neena!!! why so hard canva? everything else is so easy
Hi Shakti,
Happy to help. 🙂
Thanks I thought I was resigned to creating my template on word.doc as I could not figure it out myself. I even tried editing one of their template but the rectangle was still too thick. Time saving! ?
I was absolutely pulling my hair out trying to figure this out! You just saved me a bunch of time – and from going bald 🙂
Hi Wendy,
So happy to have helped you save your hair. 😉 It usually is little things like this that cause the most frustration.
Thank you!
That was as intuitive as quantum mechanics. I’ve been searching for a solution for DAYS!
#Canva — you listening?
All the best, Steve
Hi Steven,
Glad to help!
I had searched high and low for a way to do this in canva but nothing intuitive showed up. I don’t understand for the life of me why they don’t make it easy to put a thin border around an image. It’s something I need to do all the time for white background images. Thanks so much. I may notify them to come up with an option.
Even your option, which makes total sense now, wasn’t super intuitive (in terms of making it thinner). But I’m glad you took the trouble to figure it out. Thanks again.
Hi John,
You are right – it’s not intuitive. It took me awhile to find what I was looking for and did have to reach out to Canva to get the exact element.
At least we know that there is a way to make it happen. 🙂
I have wasted so much time trying to figure this out! Thank you so much for this post. I have bookmarked it in case I forget how to do this.
Hi Heather,
Glad to help. 🙂
Hi Neena,
This has also been driving me nuts. Do you have any suggestions about how to do this for circles? There are only 4 corner dots on a circle and although the line does get thinner when you make the circle smaller. It gets thicker again when the size of the circle is increased.
Hi Luella,
As far as circles in Canva go – the best thing I could find is this:
In the search box type in the words – thin circle outline.
About 11 rows down you will see a thin orange circle that seems to stay relatively thin when you resize it.
Comment back and let me know what you think!
Genius! That worked perfectly, thank you so much ?
You are welcome!
HA! You have NO idea how long i have faffed about trying to do this on Canva. A quick google and up your tutorial popped. THANK you 🙂
Hi Sarah,
That’s why I posted it – I went through the same frustration. Happy to have helped!